SCIM Integration
This guide explains how to integrate your identity management system with our platform using the System for Cross-domain Identity Management (SCIM) protocol. The following sections detail the configuration process, setup requirements, and supported functionality to help you automate user provisioning and de-provisioning between your Identity Provider (IdP) and our platform.
What is SCIM
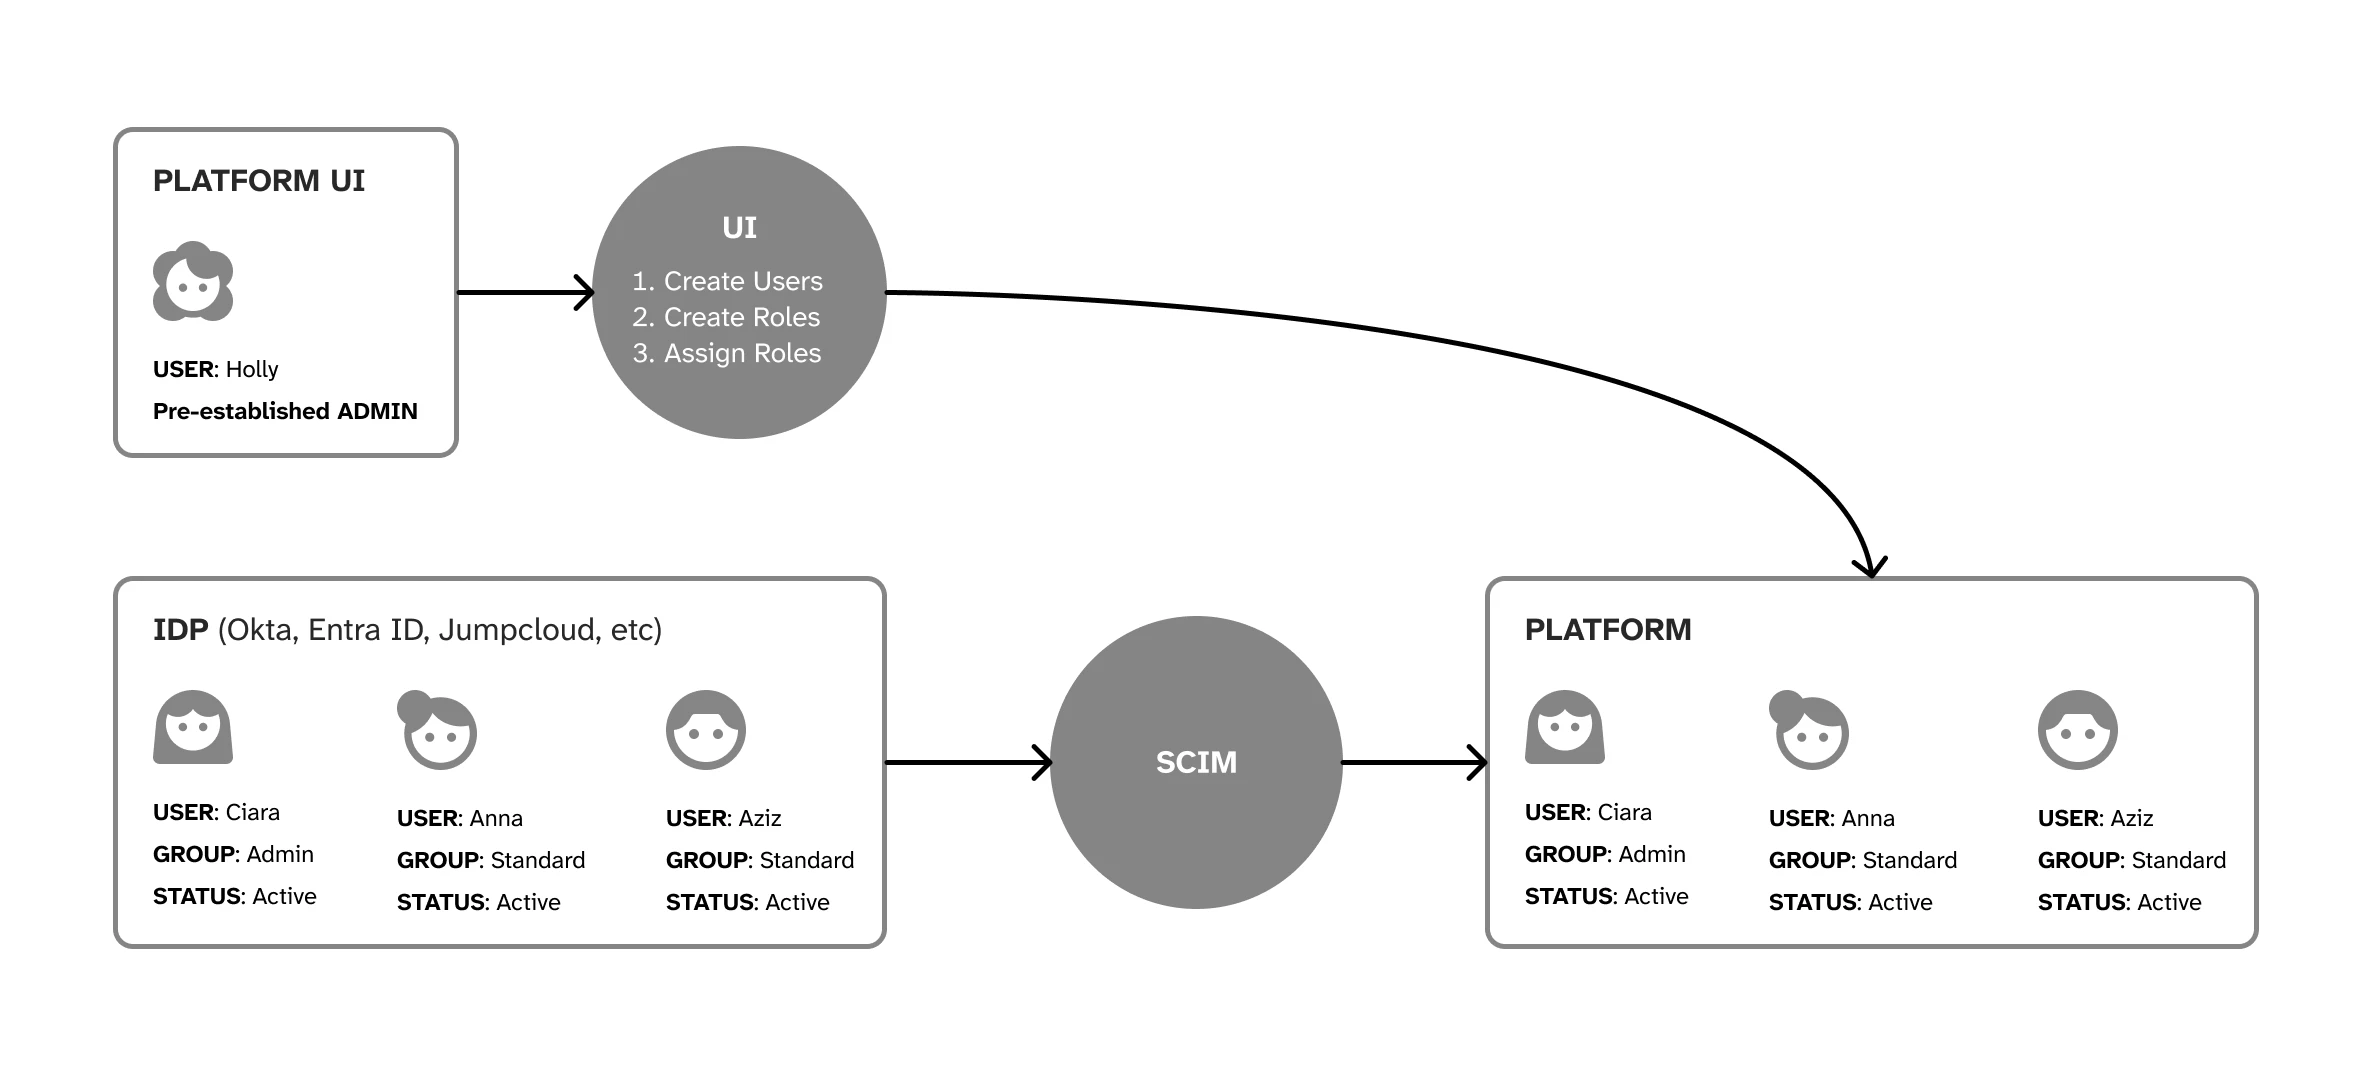
SCIM (System for Cross-domain Identity Management) is a standard that allows different systems to share user information automatically. It helps organisations manage user accounts across multiple applications without manual work. When you add, update, or remove a user in your identity system, SCIM ensures these changes happen in our platform too, keeping everything in sync. Our implementation supports the SCIM 2.0 protocol.
Features/Benefits
Our SCIM integration offers several key advantages for managing user access to our platform:
-
Automated User Provisioning: Automatically create, update, and deactivate user accounts in our platform directly from your identity provider.
-
Streamlined User Management: Maintain a single source of truth for user identities across your organisation.
-
Reduced Administrative Overhead: Eliminate manual user management tasks and minimise the risk of human error.
-
Enhanced Security: Quickly revoke access when users leave your organisation or change roles.
-
Consistent User Experience: Ensure users have appropriate access rights from day one.
Before You Begin
Before setting up SCIM integration with our platform, please ensure you have:
-
An identity provider (IdP) that offers SCIM capabilities and is compliant with SCIM 2.0
-
Our product properly set up for your client
-
Appropriate permissions to configure the integration
If you don’t have any of these prerequisites, please raise a support request and our team will assist you with the necessary arrangements.
How to Set it Up
Setting up SCIM integration with our platform is straightforward:
-
Navigate to Client Settings > SCIM Settings in our platform
-
Select your identity provider from the dropdown menu
-
Click Save to generate your configuration
-
Copy the SCIM URI displayed on the screen - you’ll need to paste this into your IdP’s SCIM configuration
-
Copy the API Key that appears - this will only be displayed once, so ensure you save it securely
-
Configure your IdP using the SCIM URI and API Key (see the “Supported Identity Providers” section for specific IdP instructions)
-
For IdP configuration instructions, look in the “Supported Identity Providers” instructions
Important: The API Key is only displayed once for security reasons. If you don’t copy it at this time, you’ll need to reset the configuration and generate a new key.
Functions we Support
Our SCIM integration supports the following core functions to keep your user management seamless and automated:
User Provisioning
-
Create new users in our platform when added to your IdP
-
Update user attributes when changes occur in your IdP
-
Deactivate users in our platform when disabled in your IdP
-
Reactivate previously deactivated users
Group Management
-
Sync group memberships from your IdP to our platform
-
Create/delete groups from your IdP
-
Update group memberships when changes occur
User Lifecycle Management
-
Automate the complete user journey from onboarding to offboarding
-
Ensure timely access provisioning and deprovisioning
Note: While groups will sync across as “roles” and creation, deletion and assigninment of these happens automatically with a SCIM integration, you will still need to add the correct permissions to these roles within our platform.
Supported Identity Providers
Our SCIM integration has been fully tested and verified with the following identity providers:
-
Microsoft Entra ID (formerly Azure AD)
-
JumpCloud
-
Okta
While these providers are officially supported, our SCIM implementation follows standard protocols, making it compatible with many other identity providers that support SCIM 2.0. If you’re using a different provider, you can still configure the integration using the standard SCIM endpoint and authentication details provided in the “How to Set it Up” section.
If you encounter any challenges when integrating with other identity providers, our support team is available to assist you. Each identity provider may have slightly different configuration requirements, which we’ve detailed in the following sections.
JumpCloud
JumpCloud is a directory platform that securely connects users to their systems, applications, files, and networks. It offers centralised user management across various IT resources.
To set up SCIM with JumpCloud:
-
Configure SCIM in the JumpCloud admin console
-
Use our SCIM endpoint and API key for authentication
For detailed instructions, refer to JumpCloud’s SCIM integration guide - https://jumpcloud.com/support/get-started-identity-management-connectors
Entra ID
Microsoft Entra ID (formerly Azure AD) is Microsoft’s cloud-based identity and access management service. It helps your employees sign in and access resources across multiple platforms and applications.
To set up SCIM with Microsoft Entra ID:
-
Use the SCIM endpoint and API key from our platform
-
Configure the integration in the Entra admin portal
For detailed instructions, refer to Microsoft’s official SCIM provisioning documentation. https://learn.microsoft.com/en-us/entra/identity/app-provisioning/user-provisioning
Okta
Okta is an identity and access management platform that connects any person with any application on any device. It provides secure access and seamless user experiences.
To set up SCIM with Okta:
-
Add our application in the Okta admin console
-
Configure provisioning using our SCIM endpoint and API key
For detailed instructions, refer to Okta’s SCIM provisioning documentation. https://developer.okta.com/docs/guides/scim-provisioning-integration-connect/main/
Other Providers
Our SCIM implementation follows standard protocols, making it compatible with many other identity providers that support SCIM 2.0. If you’re using a different provider, you can still configure the integration using the standard SCIM endpoint and authentication details provided in the “How to Set it Up” section.
If you encounter any challenges when integrating with other identity providers, our support team is available to assist you.
Attribute Mappings
The following table shows how attributes from your identity provider should map to our platform. Configure these mappings in your IdP to ensure proper user provisioning.
| SCIM 2.0 Attribute | Okta Attribute | JumpCloud Attribute | Microsoft Entra Attribute | Platform UI Attribute |
|---|---|---|---|---|
| userName | userName | username | userPrincipalName | Username |
| name.givenName | firstName | firstname | givenName | First Name |
| name.familyName | lastName | lastname | surname | Last Name |
| emails[type=“work”].value | ||||
| phoneNumbers[type=“mobile”].value | mobilePhone | mobile | mobilePhone | Mobile Number |
| phoneNumbers[type=“work”].value | - | phone | businessPhones | Work Number |
| title | title | jobTitle | jobTitle | Position |
| addresses[type=“work”].streetAddress | streetAddress | address.streetAddress | streetAddress | Street Address |
| addresses[type=“work”].locality | city | address.locality | city | City |
| addresses[type=“work”].region | state | address.region | state | State |
| addresses[type=“work”].postalCode | zipCode | address.postalCode | postalCode | Postal Code |
| addresses[type=“work”].country | countryCode | address.country | country | Country |
| active | active | activated | accountEnabled | Status |
Note: The exact attribute names may vary slightly depending on your identity provider’s configuration. Please refer to your specific IdP’s documentation for the correct attribute mapping syntax.
Deleting your SCIM Setup
When removing a SCIM configuration, you can opt in your IdP to delete the provisioning setup. It’s important that before you do, you disable and remove all users attached to the application to ensure they don’t stay in the system after the configuration is deleted.
FAQ
How do new SCIM users who don't use SSO sign in for the first time?
If a user has been created with SCIM and doesn’t sign in via the IdP’s SSO capability, they will need to set themselves a password when signing into our platform for the first time. When they sign in, they can select the “Forgot password” to initiate a password reset.
What is the difference between SCIM and SSO?
SCIM (System for Cross-domain Identity Management) handles user provisioning—creating, updating, and deactivating user accounts automatically. SSO (Single Sign-On) manages authentication, allowing users to log in once and access multiple applications. SCIM focuses on user lifecycle management, while SSO focuses on the login experience.
Do I need both SCIM and SSO configured?
No, you don’t need both. They serve different purposes and can be implemented independently. With SCIM alone, your users will still sign in using their regular credentials on our platform, but their accounts will be automatically created and managed through your identity provider.
How long does it take for user changes to sync?
Most changes in your identity provider will sync to our platform within minutes. The exact timing depends on your IdP’s synchronisation schedule. Some providers allow you to configure this interval or trigger immediate syncs.
What happens if I delete a user in my IdP?
When you delete or deactivate a user in your identity provider, the user will be deactivated in our platform—not deleted. This preserves any historical data associated with the user while preventing further access. The user can be reactivated if restored in your IdP.
Can I map custom attributes?
Our standard implementation supports the core attributes listed in the Attribute Mappings section. Custom attribute mapping is not available through the self-service configuration. However, if you have specific requirements for custom attributes, please reach out to our support team who can evaluate your request.
What should I do if I lose my API key?
If you lose your API key, you can generate a new one by returning to Client Settings > SCIM Settings and clicking the “Rotate API Key” option. This will invalidate the previous key and generate a new one. You’ll need to update this new key in your identity provider’s configuration immediately.
How do I troubleshoot if users aren't being provisioned correctly?
If users aren’t being provisioned correctly:
-
Verify your SCIM endpoint URL and API key are entered correctly in your IdP
-
Check that user attributes are mapped properly in your IdP
-
Review your IdP’s provisioning logs for specific error messages
-
Ensure the users are assigned to the application in your IdP
-
Contact our support team with specific details about the issue you’re experiencing