Web2SMS
Welcome to Web2SMS! This application allows you to send messages to one or multiple recipients, organise your recipients into groups and receive and respond to message replies.
Start Sending Now
Before sending a message, you may wish to do the following.
- Create contacts (message recipients). See the Contacts section of this user guide
- Create groups to organise your contacts. See the Groups section below
- Set up a template for your message content. See the Templates section
Navigation
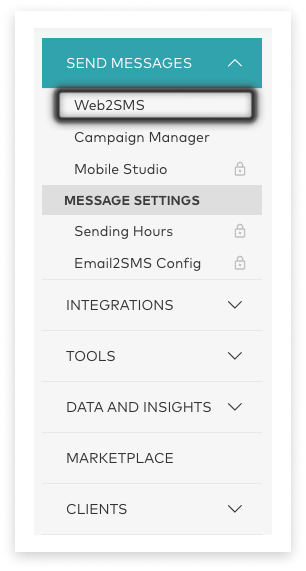
Web2SMS can be found under ‘Send Messages’ in the side menu.
If it appears ’locked’ in the menu, then it is available to request by clicking the ‘Request This Product’ button.
Send New Message
Below are the instructions for sending or scheduling a message using Web2SMS.
Recipients
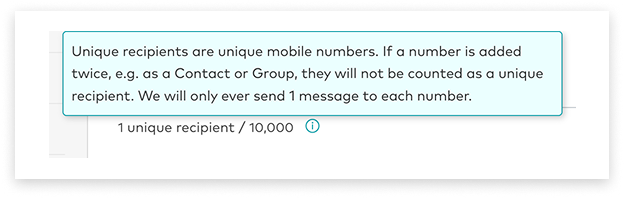
Send to up to 10,000 unique recipients.
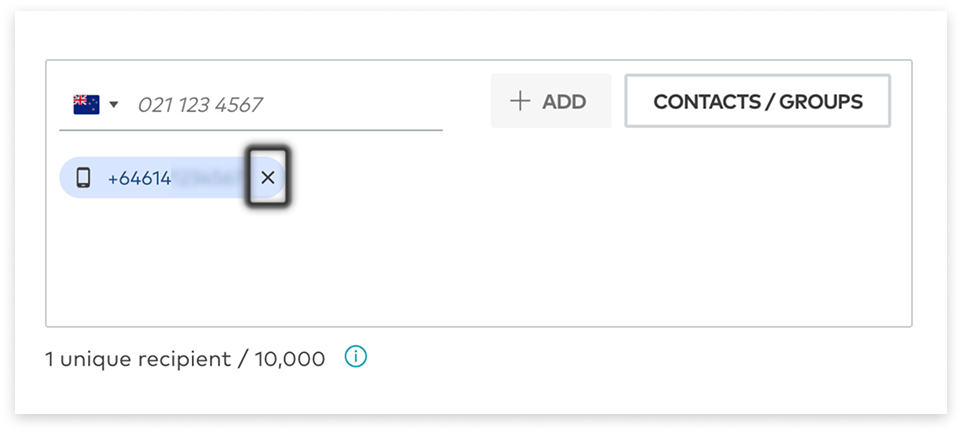
Add Mobile Numbers
- Your mobile input will default to [insert default here] country. Click to change to a different-destination country mobile format, as required.
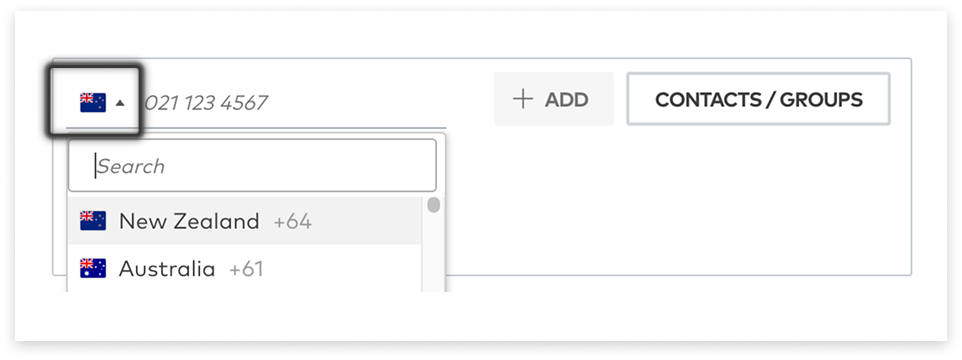
- Type or paste the mobile number into the mobile field. This field will accept:
- International format (e.g. +64…)
- Standard format for the country selected (e.g. 021…)
- Shortened format for the country selected (e.g. 21…)
- There are a few ways to add this mobile number to your recipients:
- Hit ‘Enter’ on the keyboard
- Click the ‘Add’ button which activated once a mobile is entered
- Hit ‘Tab’ on the keyboard to move the focus to the Add button, then hit ‘Enter’
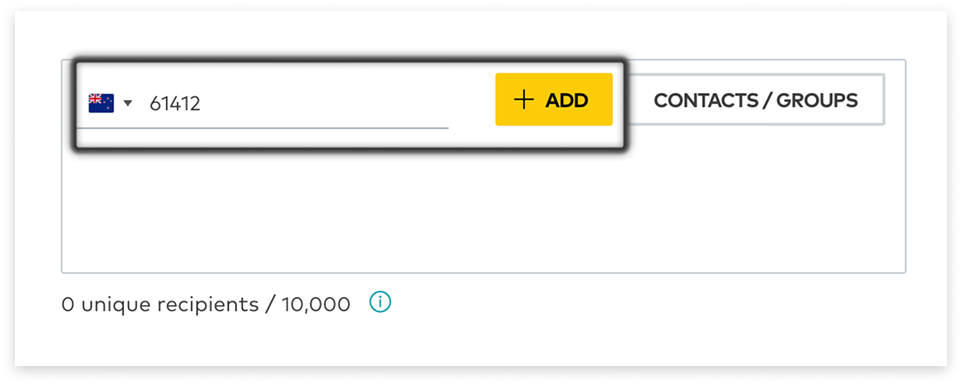
- A chip will be created per mobile, displayed in International format.
Add Contacts or Groups
- Click the ‘Contacts / Groups’ button.

- Contacts are displayed first; navigate to Groups using the tabs at the top.
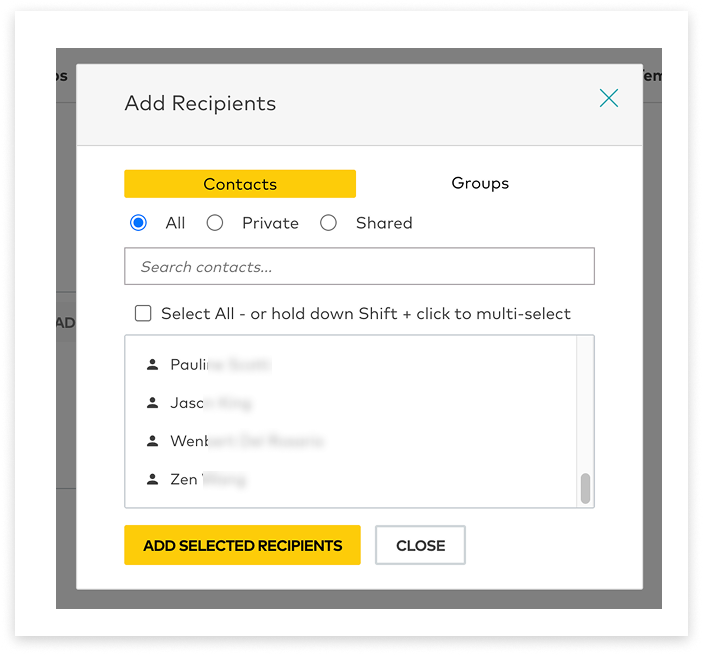
- There are a few ways to select Contacts / Groups:
- Search by the Name of a contact or group
- Use the Select All checkbox
- Hold down Shift on the keyboard and click to select multiple contacts or groups chunked together
- Click and drag for the same effect
- Hold down Ctrl on keyboard and click to select multiple contacts or groups that are separate from each other on the list
- Click ‘Add Selected Recipients’. Be aware this will add both currently-selected Contacts and Groups, at the same time.
Unique Recipients
Web2SMS will only send each message to a mobile number, once.
Recipients are therefore checked and added (or if they are duplicates, then not-added) by mobile number:
- Duplicate mobile numbers are not added as Recipients or displayed as chips
- Duplicates that are added in Groups will not be sent to
- It is possible to have a mobile number saved as both a private AND a shared contact;
- One will be treated as a duplicate
For these reasons, recipient chips may not match the unique recipient total:
Remove Recipients
Click the X on any chip to remove the recipients within.
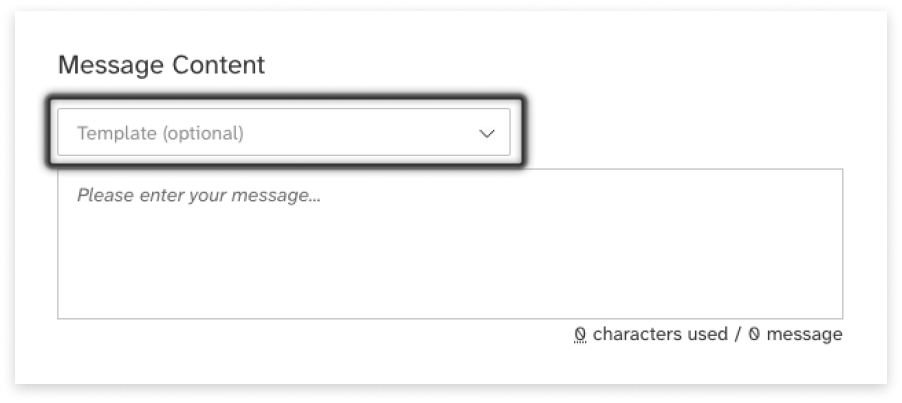
Compose a Message
You can choose to start with an (editable) template or compose from scratch - and check your character count and message-units as you go.
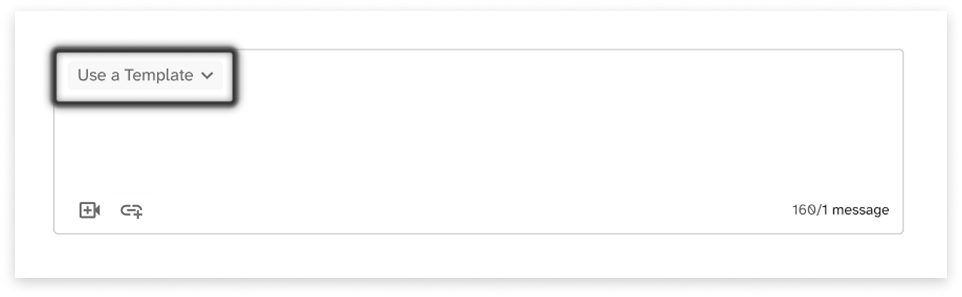
Starting With a Template
Templates are optional to use. They act as a starting-point, and can be edited in the message composer.
- Select a template from the list
- Edit the template content as needed
- For template creation guidance, see the Templates page
Writing a Message
Write your message in the text field. You will also be able to see:
- How many characters you have used
- Which encoding is being used
- Hover over the ’__ characters have been used’ for more detail
- More about this below, under message encoding

- How many SMS units will be sent per message:
- Next to the character counter
- As a notification under the message field
- Again in the summary, to be reviewed before sending
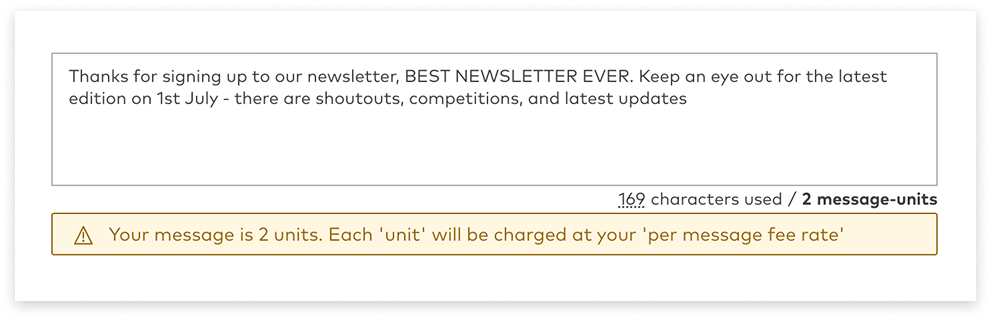
Message Encoding
By default, messages will use GSM encoding. GSM encoding includes the basic character set, including the standard English alphabet, numbers and standard special characters such as punctuation. When using GSM encoding, you are permitted 160 characters per SMS message unit.
If you add a non-GSM character, such as a letter with an accent, and emoji, or a letter in a non-English alphabet, the encoding of the message will switch to UCS-2. Messages encoded in UCS-2 take up more space than GSM characters, so you will be limited to 70 characters in order for your message to fit within a single SMS message unit.

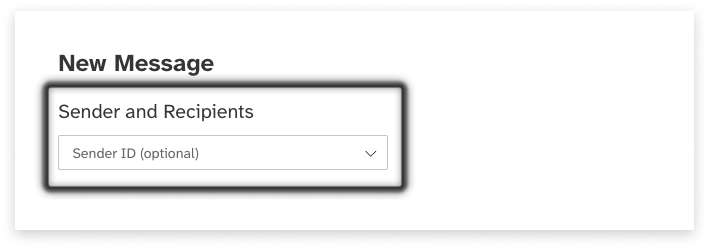
Sender ID
Not all countries allow people to mask their number with a Sender ID;
- Australia will soon require a registered Sender ID for business messaging.
- New Zealand, on the other hand, does not allow the use of Sender ID.
If your user account is set up with permission to use Sender ID, you will see this dropdown:
Important Notes: Sender IDs
- Sender ID (also called Source Masks) display custom ‘From’ details to a recipient, instead of an originating number
- Replies are not possible with messages masked by a Sender ID
- NZ availability: International messaging only (carrier dependent)
- Contact your account manager to request Sender ID
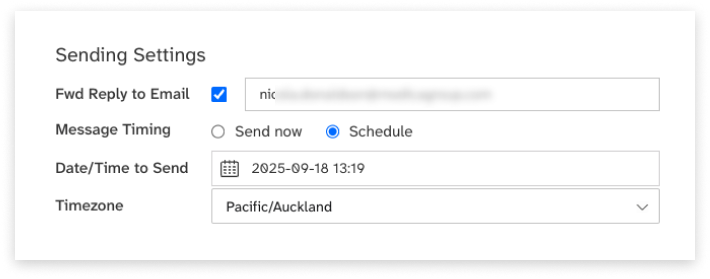
Fwd Replies to Email
- Tick the checkbox to enable reply-forwarding
- Enter a forwarding email address (optional)
- Replies will be sent to this address, as well as appearing in the Inbox
Important Notes: Email Forwarding
- Replies are forwarded to nominated email address
- Direct email replies are not supported - use the Web2SMS Inbox to send replies back to SMS
- Single forwarding address only (use distribution list for multiple recipients)
Send or Schedule
If choosing to schedule your message to send at a later date:
- Select the ‘Schedule’ radiobutton option
- Set future date and time
- Select relevant timezone
Review Before Sending
There is a step to review the number of recipients, credits (if you use them), and total message-units before sending.
- Click ‘Review and Send’ or ‘Review and Schedule’
- Confirm everything is as expected
- Click ‘Send Now’ or ‘Schedule’
Contacts
Contacts are message recipients whose details you have saved in Web2SMS. Contacts can be shared within your organisation or private to you.
Contacts can be organised into groups to allow you to send messages to an entire group rather than adding each contact individually.
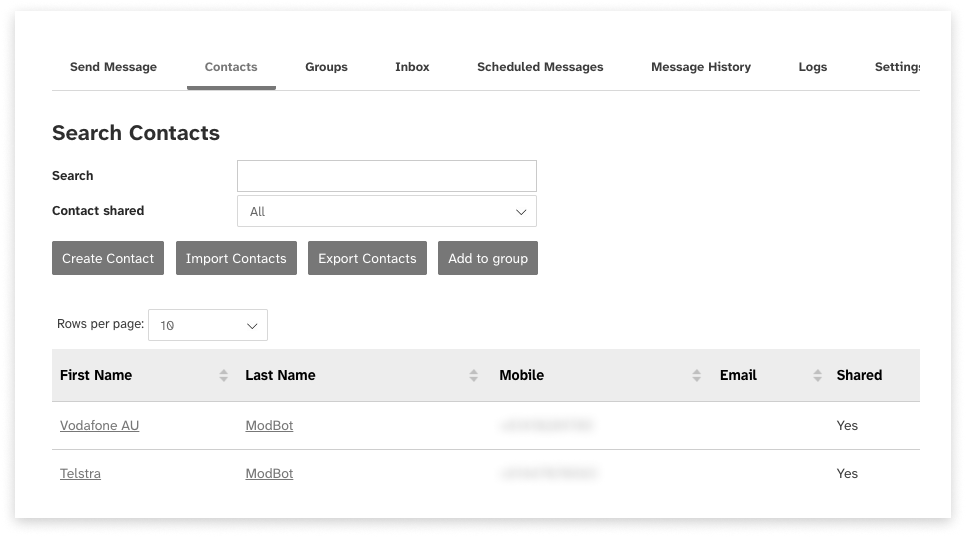
View Contacts
To see a list of your contacts, navigate to the Contacts tab. You can view:
- The contact’s name and contact details
- Whether the contact is shared (visible to others in your organisation)
Narrow down the list using the search fields. You can search for contacts by name, mobile number or email address, as well as whether they are shared or private.
Create a Contact
You can create contacts manually or by importing contact data from a spreadsheet.
You can create:
-
Up to 5,000 shared contacts
-
Up to 5,000 private contacts
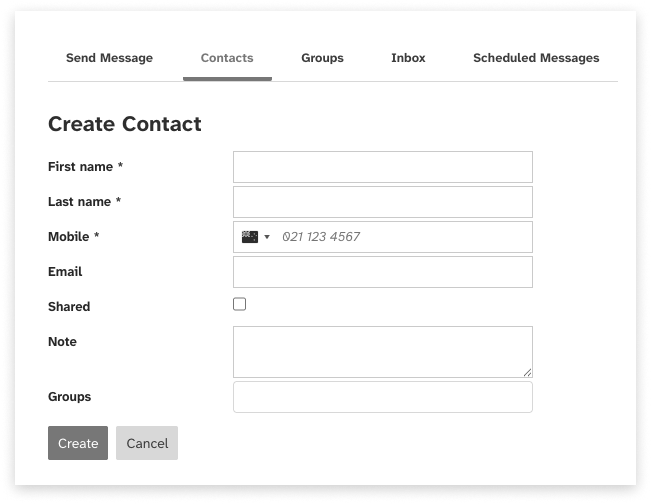
1. Create a contact manually
To manually create a contact:
- Navigate to the ‘Contacts’ tab
- Click ‘New contact’
- Enter the contact’s name and details
- Choose whether the contact is shared with others in your organisation
- If you wish, add the contact to a group
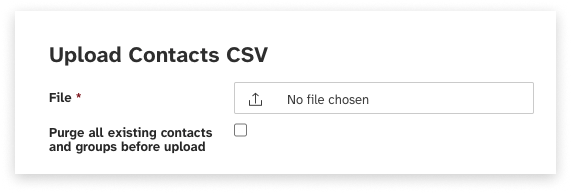
2. Import contacts
To import contacts from a spreadsheet:
- Prepare a CSV file of contact information using the file format instructions below
- Navigate to the ‘Contacts’ tab
- Click ‘Import contacts’
- Ensure that any groups you would like to add contacts to have been created
- If you wish, choose to purge all of your existing contacts and groups and replace them with the contacts in your spreadsheet
- Select and upload the file
Contact File Format
The contact file must meet the following requirements.
- The file must be either:
- A CSV file
- A TXT file containing plain text with fields separated by commas and records separated by line breaks
- The file must have a header row containing the correct field names. Some variations on field names are allowed; for a full list, see the ‘Permitted field headings for contact upload’ section of this user guide
- Each contact record must include a mobile phone number. All other fields are optional
- Up to 5,000 shared and 5,000 private contacts can be stored in Web2SMS
- Contact records must conform to the formatting requirements listed below
- The CSV must be encoded in UTF-8.
| Field name | Description | Required/optional | Data format | Field length |
|---|---|---|---|---|
| Mobile | Contact’s mobile phone number. | Required | Correctly formatted mobile phone number:
|
Minimum 9 characters. |
| First Name | Contact’s first name. | Optional | Alphanumeric characters. | Maximum 100 characters. |
| Last Name | Contact’s last name. | Optional | Alphanumeric characters. | Maximum 100 characters. |
| Contact’s email address. | Optional | Correctly formatted email address. | Maximum 200 characters. | |
| Shared Contact | Whether the contact will be shared with other users in your organisation. | Optional | One of the following:
|
N/A |
| Group Name | Name of an existing group to which the contact should be added. | Optional | Alphanumeric characters. Group names are case-sensitive. The contact may be added to multiple groups by using a comma-separated list of group names that is enclosed in double quotation marks. For example: ‘GroupName1,GroupName2’ | Maximum 255 characters. |
Template Contact CSV
The following files can be used as a basis for uploading contacts.
| Sample TXT file | Sample CSV file |
|---|---|
| Web2SMS sample contact upload file.txt | Web2SMS sample contact upload file.csv |
Permitted Field Headings
When importing contacts using a CSV file, there are a number of permitted field headings. Please ensure that the headings in your CSV file match one of the options below.
| Field | Permitted field headings |
|---|---|
| Mobile number |
|
| First name |
|
| Last name |
|
| Email address |
|
| Shared status |
|
| Group |
|
Add Contacts to Group
To add contacts to a group:
- Ensure you have already set up the group in the Groups tab. For details on creating groups, see the Groups section of this guide
- Navigate to the Contacts tab
- Locate the contact(s) to be added to the group
- Select the contact records in the list using the select box
- Click ‘Add to group’ button
- Select the group to which you wish to add the contacts
- Click ‘Submit’
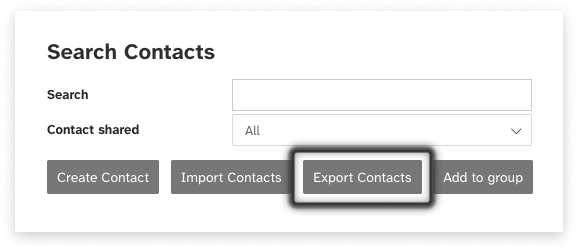
Export Contacts
To export a list of all your contacts and their details to a CSV file:
- Navigate to the Contacts tab
- Click ‘Export contacts’
- The CSV file will download automatically
Note: this action will download ALL your contacts, including any that are not displayed on the search screen
Edit or Delete Contacts
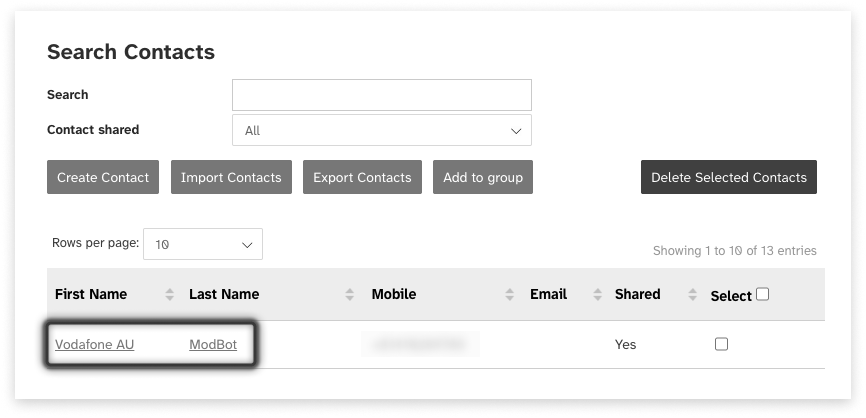
Edit Contacts
To edit the details of a contact:
- Navigate to the Contacts tab
- Locate the contact(s) to be edited
- Click on the contact’s first or last name
- Edit the contact’s details, add or remove them from groups, etc
- Click ‘Update’
From this screen, you can also view a history of messages received from or sent to this contact
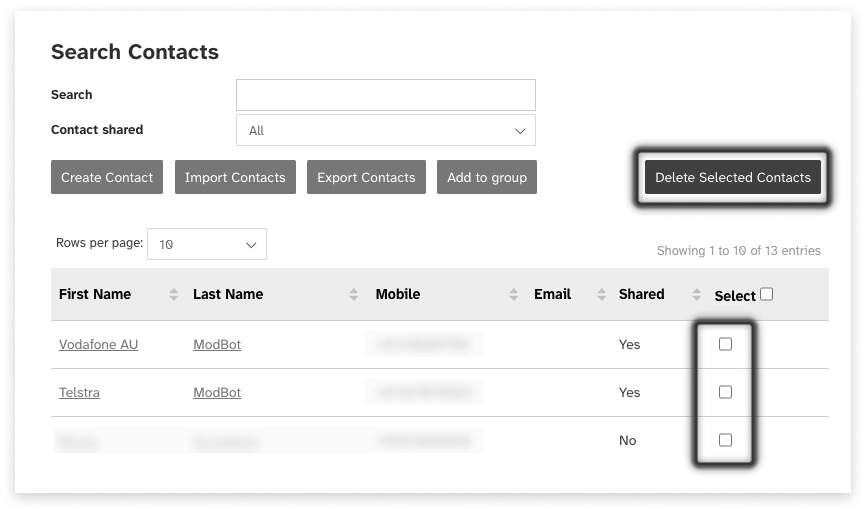
Delete Contacts
To delete a contact:
- Navigate to the Contacts tab
- Locate the contact(s) to be deleted
- Select the contact records in the list using the select box
- Click ‘Delete’
Groups
Groups allow you to organise your contacts so that you can easily send bulk messages without having to enter all contacts individually.
Groups can be shared within your organisation or private to you. If a group is shared, all contacts within the group must also be shared. Private groups may contain a mixture of shared and private contacts.
View Groups
To see a list of your groups, navigate to the Groups tab. You can view:
- The group’s name
- Whether the group is shared (visible to others in your organisation)
- How many contacts (members) are included in the group
- Narrow down the list using the search fields. You can search for groups by name and by whether they are shared or private
Create a Group
To create a group:
- Navigate to the ‘Groups’ tab
- Click ‘Create a group’
- Enter the group’s name
- Choose whether the group is shared with others in your organisation. If it is shared, it may only contain shared contacts.
Add or Remove Contacts from Groups
Add contacts to a group on the Contacts tab. For more details, see the Add Contacts to Group section of this user guide.
Remove contacts from a group by editing the contact. For more details, see the ‘Manage contacts’ section of this user guide.
Inbox
When a recipient replies to a message you send via Web2SMS, you can view that reply in the Inbox.
Notifications
When a new reply is received, a notification badge will appear on the Inbox tab. The number in the notification indicates how many unread replies there are across all conversations. In the conversations list, message summaries for threads with unread replies appear in bold. A notification badge also appears next to the summary, indicating how many unread replies there are for that particular conversation. Inside the conversation view, unread replies appear with a highlighted outline.
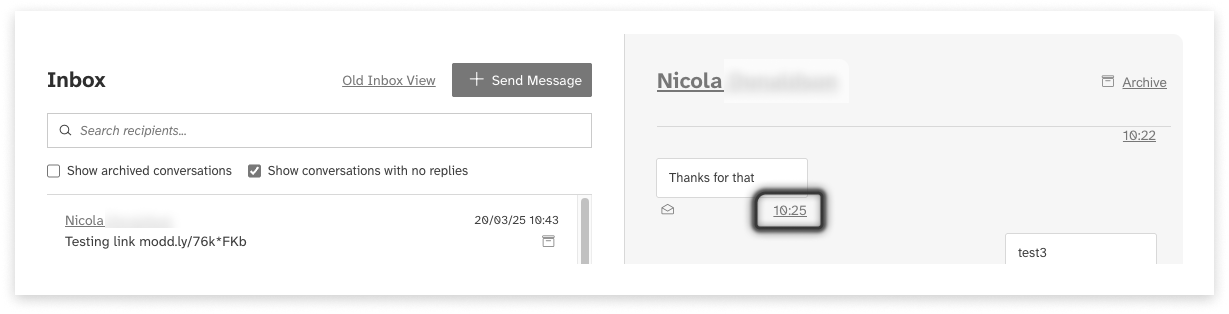
Conversations
Messages in the Inbox are grouped into conversation threads based on the recipient.
In the conversation summary list, each thread contains:
- The recipient
- If the recipient is a saved contact then the contact name is displayed on the left, mobile number on the right of the row
- If the recipient is not savesd, the mobile number is displayed instead
- The most recent outbound message
- If a response has been received to the most recent outbound message, then the reply is also displayed in italics.
- A timestamp for the most recent message in the conversation (sent or received)
- A badge with the amount of unread messages in the conversation (if applicable)
- An icon to archive the conversation
Click on a thread to view your conversation history with that recipient. Inside the conversation view is:
- The recipient
- If the recipient is a saved contact you can also click on the contact’s name to update their details
- An icon to archive the conversation
- Messages you have sent to the recipient are displayed on the right-hand side of the conversational view, and replies are displayed on the left
- Messages are sorted chronologically with a sub-header for each date. Individual messages also have a timestamp, and replies have an icon to mark as read or unread
- On mobile, clicking on a conversation from the list will open the message history in a separate page
- Click the ‘Back’ link above the contact title to return to the conversation list

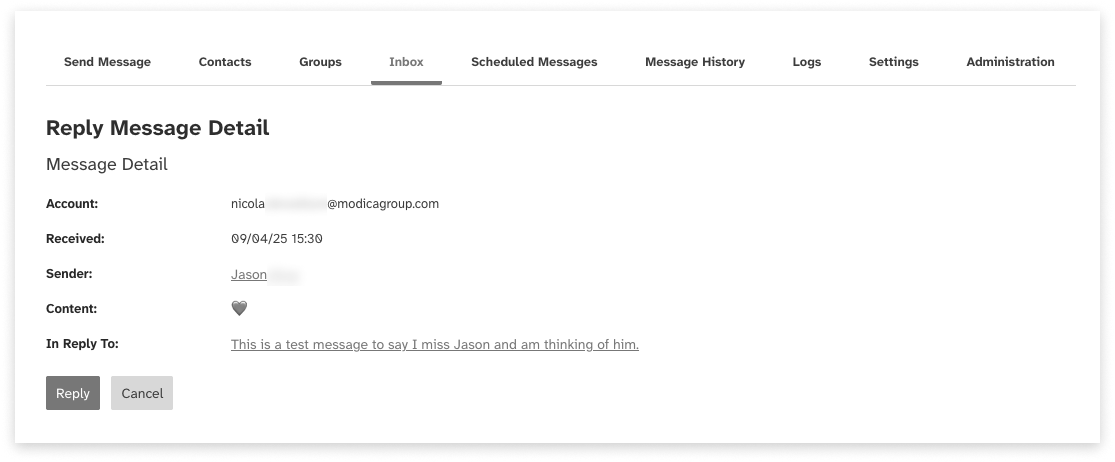
Replying
To reply to a message that was received via Web2SMS:
- Navigate to the Inbox tab
- Open the relevant conversation from the list on the left
- Type your message or select from your existing templates
- Click ‘Send Reply’
Link Shortening
Web2SMS Inbox can detect and shorten long URLs in your message content to save character count and improve readability.
If you would like to make use of this feature for free for the next 6 months, click the icon (below) and click ‘Request This Product’
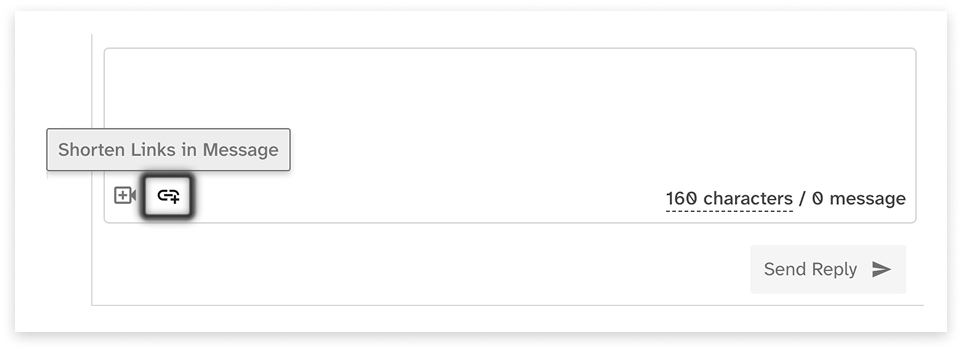
- Compose your message with one or more URLs containing
https:// - Click the link icon in the message toolbar
- A modal will appear asking ‘Would you like to shorten all links in this message?’
- Click Yes to proceed with shortening
Before shortening:
https://somereallyreallyreallreallylong.link?with=some¶mters=here
After shortening:
https://modd.ly/CGmm+9b
Important Notes
- Only HTTPS links are detected - URLs must start with
https://to be eligible for shortening - Smart shortening - If a URL is already shorter than the generated short link, it will remain unchanged
Want more from your shortened links? Upgrade to our full link shortening solution to access:
- Click tracking and analytics - See who clicks your links and when
- Custom branded URLs - Use your own domain for shortened links
- Advanced link management - Edit, archive, and organize your links
Email optussd@modicagroup.com to upgrade.
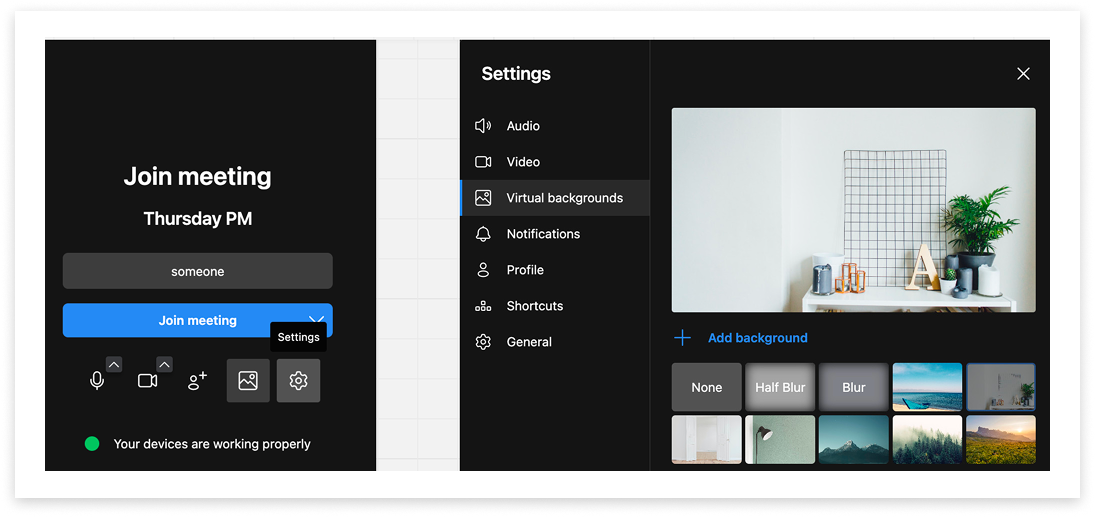
Video Feature
Video as a Feature in Web2SMS provides simplified access to our Video Product. When enabled, you can video call directly within the app, making it faster and easier to launch a live video call with SMS recipients. A great tool for complex explanations or clearer communication and more meaningful customer interactions.
This powerful tool provides all the basic features you need to send a link and immediately start a video call with a recipient. No software required.
To activate the feature, click on any message in the Inbox and click the ‘video’ icon, this will trigger a request to have it turned on for you. (Provisioning requires back end configuration.)
Once activated, you can:
- Select any message in your Inbox and Click the Video button to generate an invite link
- It will be inserted directly into the reply-composer
- Hit Send!
- Click on the link to Start a Video Call and wait for your guest to join
- Access a range of familiar Video Call Settings to adjust your interaction
Want more features from Video?
Upgrade to our full Video API solution to access:
- Reporting and analytics
- Custom branded URLs and Watermarks
- Cloud-based meeting recording
- Live Streaming to platforms like YouTube, via RTMP
- PSTN dial-in and call-out capabilities
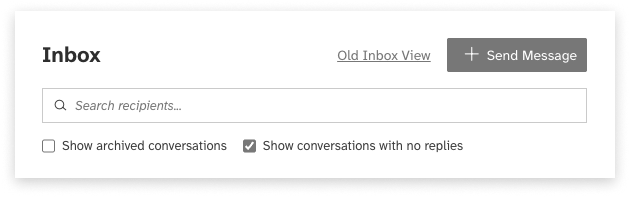
Search the Inbox
You can filter conversations using the checkboxes at the top of the thread list.
- Show archived conversations will include conversations that have been marked as archived. Archived conversations are denoted with the label (Archived) at the end of the recipient name.
- Show conversations with no replies will display conversations that have not yet received a response - i.e. the only history in the conversation is you messaging the recipient. Until this has been toggled, conversations with no replies do not appear in the Inbox.
- Using the search bar you can also look for conversations by entering a recipient’s name or mobile number. Search results are highlighted in bold. Click on the ‘X’ in the search bar to clear the current search and view all conversations again.
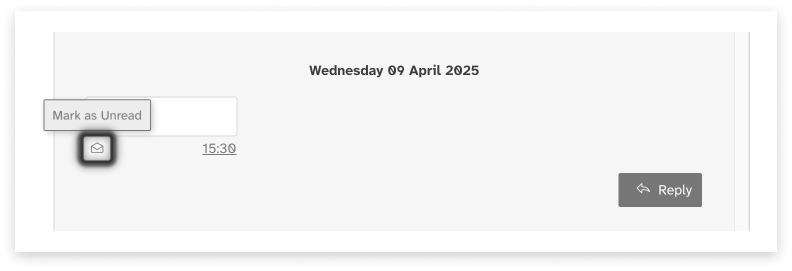
Mark as Unread
Unread replies appear with a highlighted outline in the conversation view. To mark a reply as read, simply open the conversation and view the message. Once the unread reply has been scrolled into view, it will be automatically marked as read.
If you need to follow up on a message later, you can set a reply as unread by clicking the ‘Mark as unread’ icon underneath the message.
The message will remain as unread until navigating away and viewing the conversation again. If you’ve marked a message as unread and would like to undo this, the ‘Mark as unread’ icon will turn into ‘Mark as read’ while in the conversation view.
Archive
You can archive conversations to help manage your thread list. There are two ways to do this:
- In the conversation list, click the ‘Archive’ icon on the right-hand side underneath the timestamp
- In the conversation view, click the ‘Archive’ link in the header to the right of the recipient name
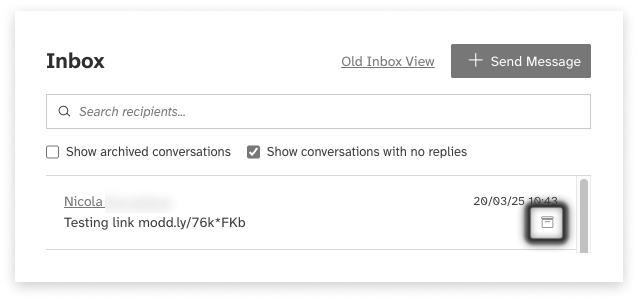
To view archived conversations, toggle the ‘Show archived conversations’ option in the conversation list. Archived conversations are denoted with the label (Archived) at the end of the recipient name. To unarchive a conversation, simply click the same icons used to archive - these will now be labelled as ‘Unarchive’ instead. Conversations are automatically unarchived upon sending or receiving messages for the relevant recipient.
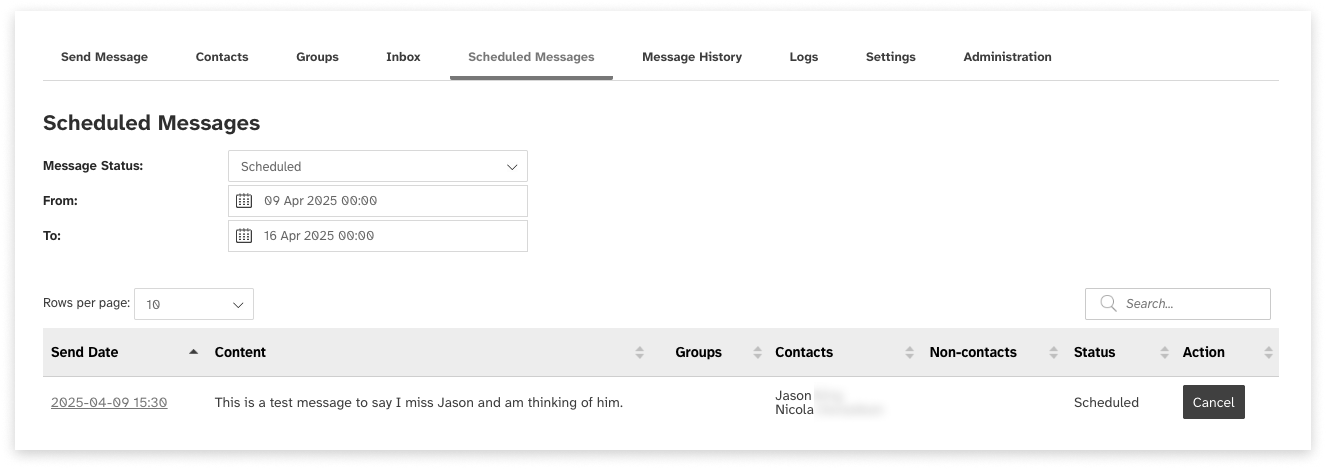
Scheduled Messages
You can view and change messages that are scheduled to be sent at a later time.
View Scheduled Messages
To view scheduled messages, navigate to the Scheduled Messages tab. This tab shows all messages that you have scheduled to be sent in the future. You can view:
- When the message is scheduled to be sent
- The content of the message
- The groups, contacts and individual mobile numbers the message will be sent to
- The status of the message
Narrow down scheduled messages using the search fields. You can search for scheduled messages by their status or by a date range in which they are scheduled to be sent.
Edit or Cancel
Edit a Scheduled Message
To edit a scheduled message:
- Navigate to the Scheduled Messages tab
- Locate the scheduled message to be edited
- Click on the message’s Send Date
- Edit the details of the message
- Click ‘Update’
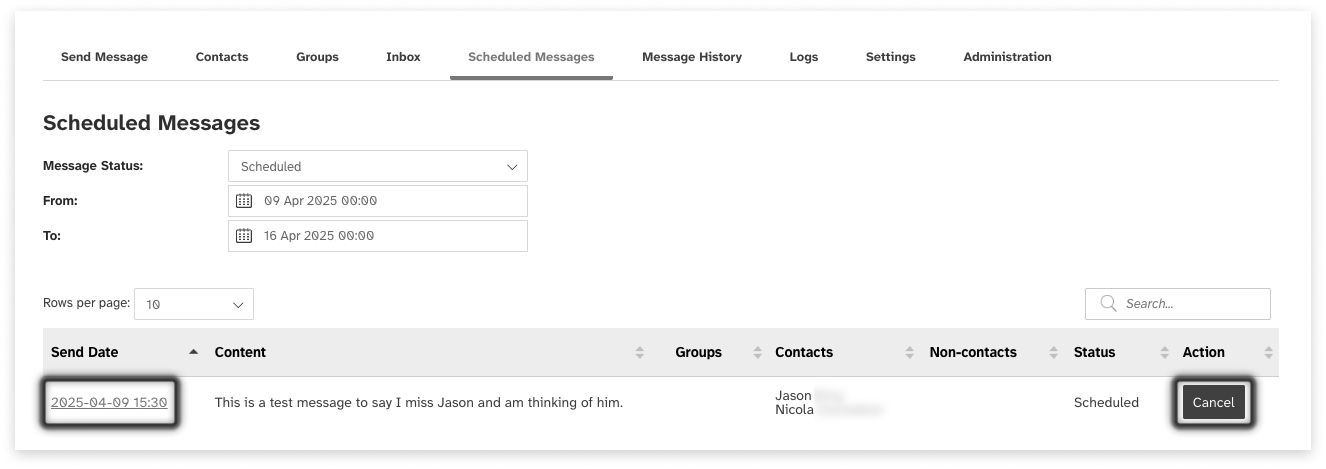
Cancel a Scheduled Message
To cancel a scheduled message:
- Navigate to the Scheduled Messages tab
- Locate the scheduled message to be canceled
- Click ‘Cancel’
- Confirm that you wish to cancel the message
Templates
Templates allow you to create standard messages that can be re-used by anyone in your organisation.
View Templates
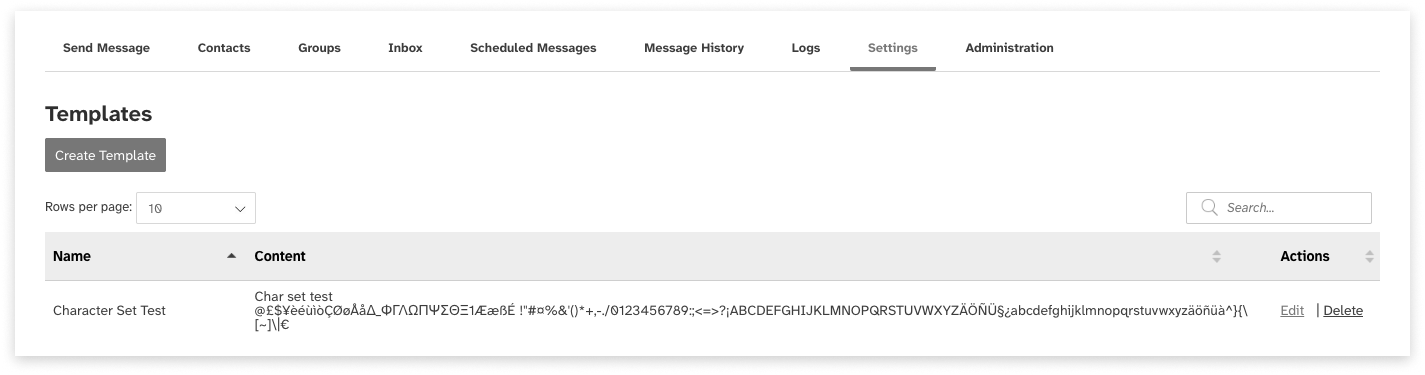
To see a list of templates for your organisation, navigate to the Settings tab.
There, you can view:
- The name of the template
- The content of the template
- Narrow down the list using the search fields. You can search for templates by name or content
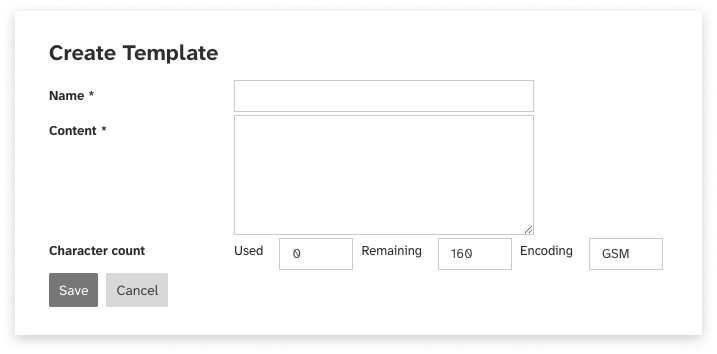
Create a Template
To create a new template:
- Navigate to the Settings tab
- Click ‘Add new’
- Enter the template’s name. Template names must be unique
- Enter the content of the template
- Click ‘Save’
Web2SMS will tell you:
- How many characters have been used in your message so far
- How many characters remain to be used if your message is to fit within a single SMS message unit
- The encoding used in the message. For further details on message encoding, see Message Encoding in this user guide.
Edit or Delete
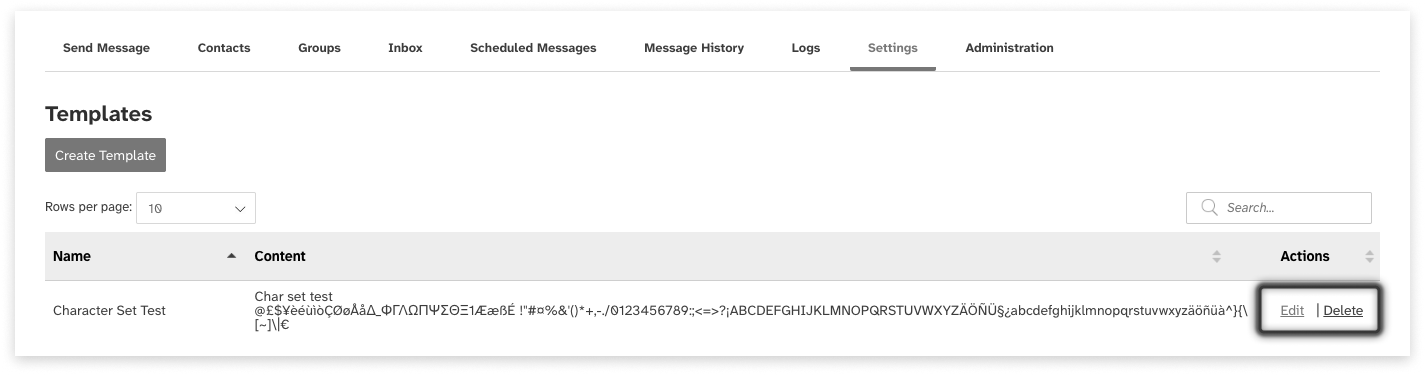
Edit a Template
To edit the details of a template:
- Navigate to the Settings tab
- Locate the template to be edited
- Click ‘Edit’
- Edit the template’s details
- Click ‘Save’
Delete a Template
To delete a template:
- Navigate to the Settings tab
- Locate the template to be deleted
- Click ‘Delete’
Using Templates
Templates can be used in the ‘Send messages’ tab while composing a message. For more details, see the Send Messages section of this user guide.
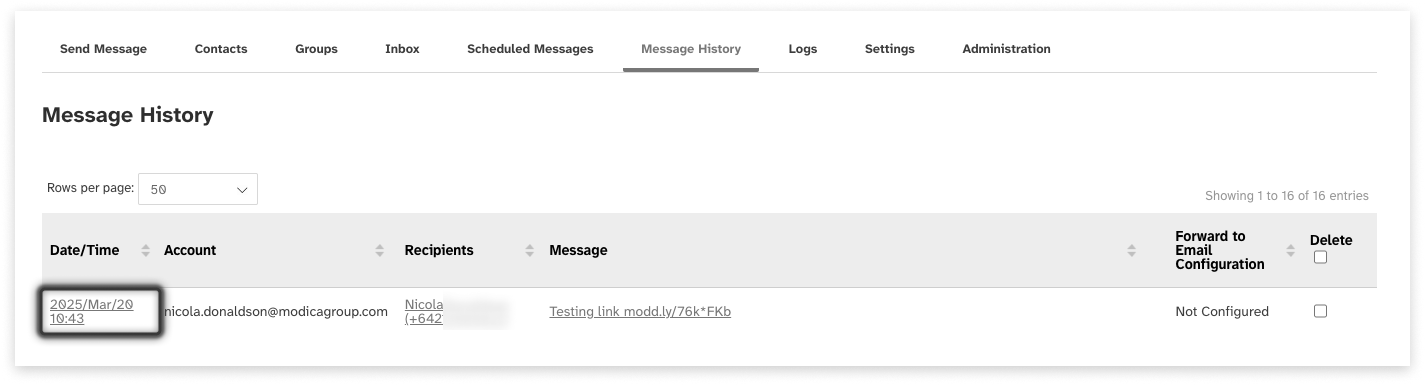
Message History
The message history shows a history of the messages sent and received in Web2SMS.
View Sent Messages
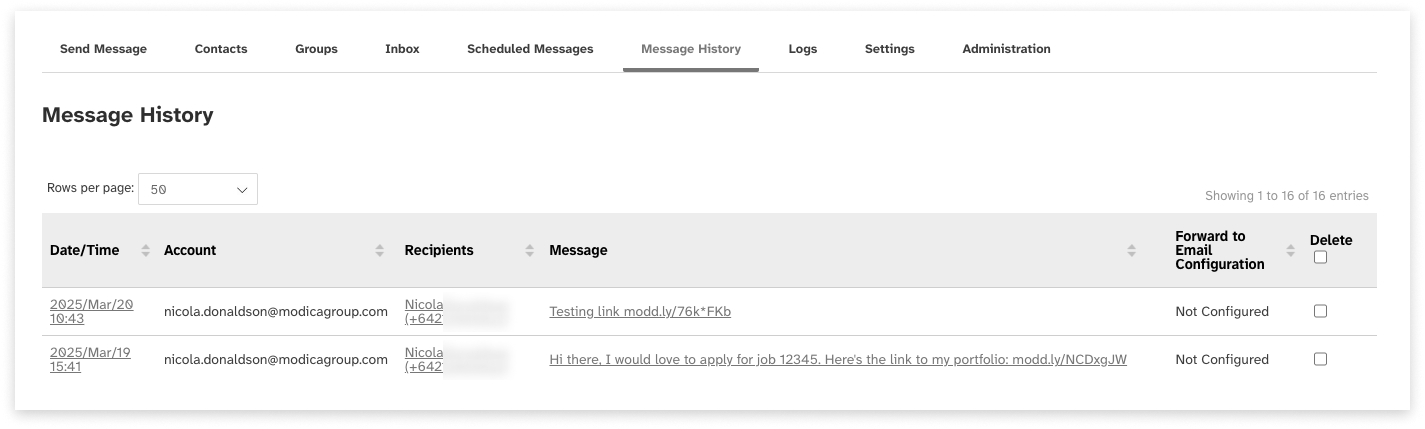
To view sent messages, navigate to the Message History tab. You can view:
- When the message was sent
- The user account that sent the message
- The mobile number to which the message was sent
- The content of the message
- The email address (if any) to which the reply was forwarded
- The message history shows only sent messages, not replies
View Status and Replies
To view the history of a sent message and its replies:
Navigate to the Message History tab. Locate the message you would like to view the history for. Click the sent date, recipient mobile number or content of the message.
You will be able to see:
- The details of the sent message.
- The status of the message, i.e. whether it has been received.
- The replies that have been received in response to the sent message.
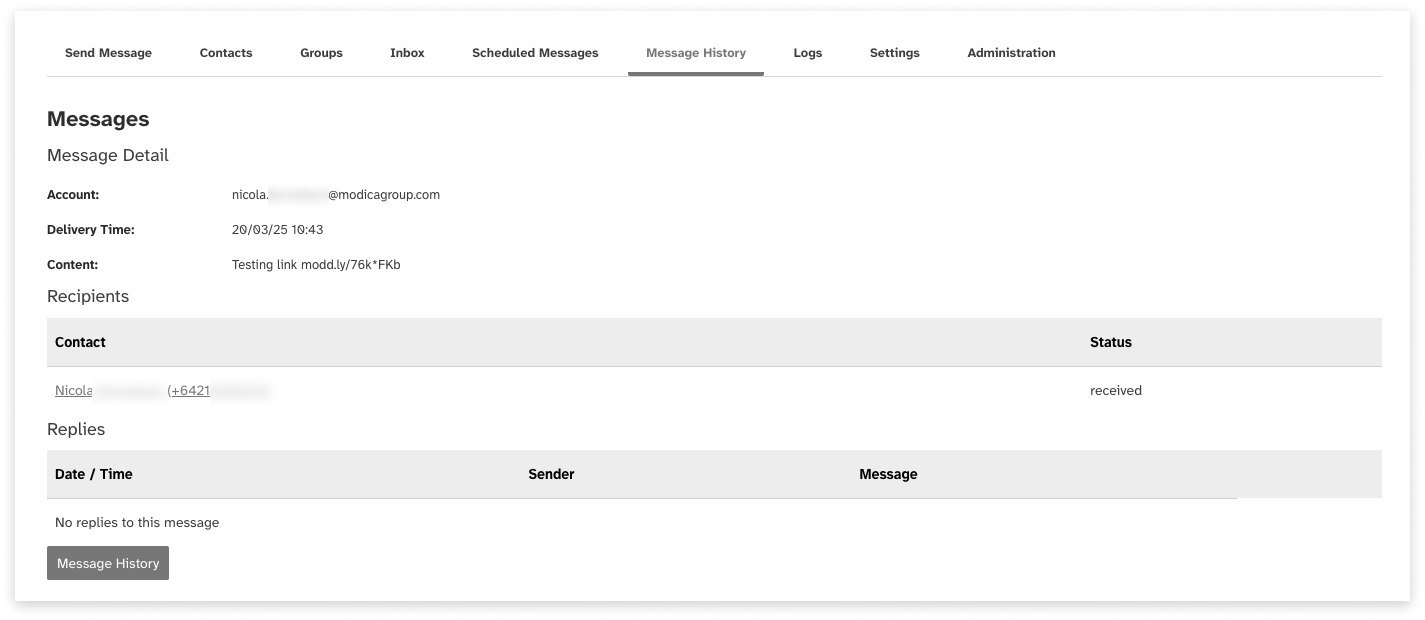
You can also view status and replies from both Inboxes:
Delete Message History
To delete a sent message from the message history:
- Navigate to the Message History tab
- Locate the message you would like to delete
- Select the message in the list using the select box
- Click the ‘Delete’ button
Logs
The Logs section of Web2SMS shows a history of changes to contacts, groups and templates.
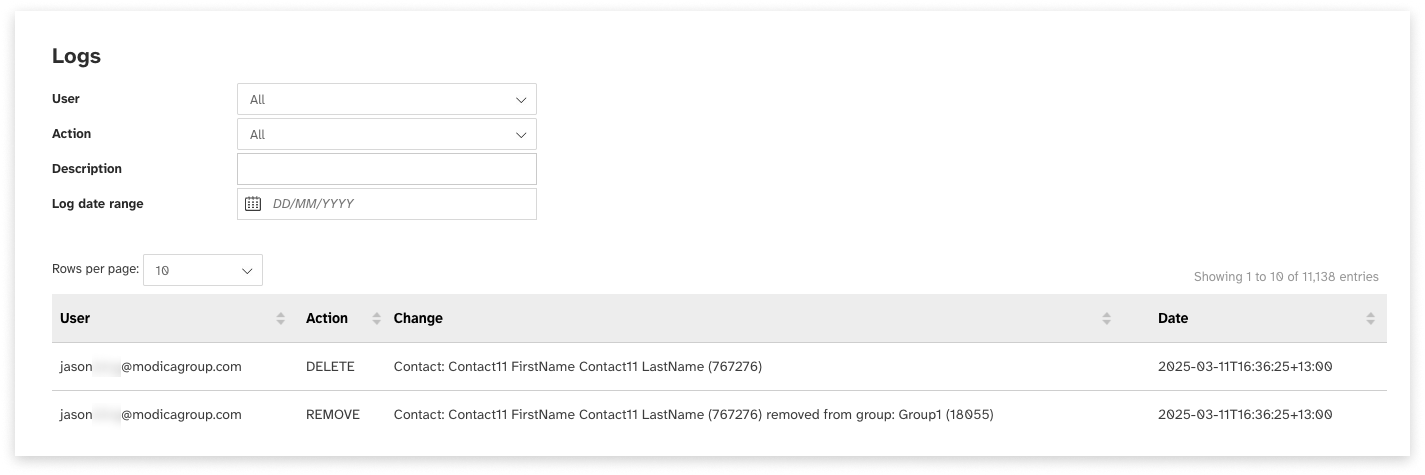
To view a history of changes, navigate to the Logs tab. You can view:
- The user who made the change
- The action they took:
- Add: A contact, group or template was added
- Edit: A contact, group or template was edited
- Delete: A contact, group or template was deleted
- Remove: A contact was removed from a group
- The change that was made
- The date and time on which the change was made
Narrow down log entries using the search fields. You can search for logs by the user who made the change, the action that was taken, the content of the change (e.g. the name of the contact), or the date range in which the change was made.