Email2SMS
Email2SMS allows you to send and receive text messages from your email client or application. The Optus SMS Suite sends an email (which is converted to an SMS) to multiple mobile numbers, and the recipients can then reply to the message. The response is automatically converted into an email which is received into the sender’s email application.
Start Sending Now
Once you log in, there are only three primary settings that need to be configured before you can start sending straight away.
- Add your company website as an Allowed Domain
- Tick the ‘Accept All Recipients’ setting
- In the Prefix Mapping tab, map numbers to their international format
Customise Your Experience
- Lock-down the ability to send to a specific person (or people) in your company
- Create groups for easy bulk-SMS sending
- Ensure email signatures or disclaimers won’t be accidentally sent
- Turn 2-way communication into 1-way only*
- Configure to receive messages in to a designated email address
*this option is only available in some countries
Navigation
Once configured, sending SMS with Email2SMS is done from your email.
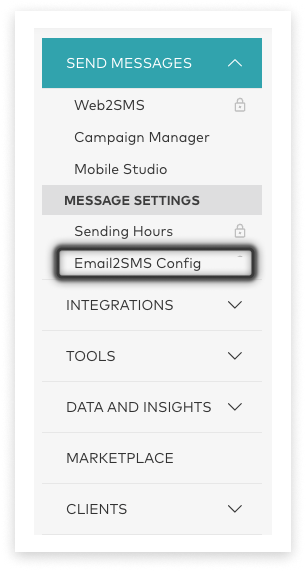
If you are looking for Email2SMS Configuration - it is located under ‘Send Messages’ in the side menu.
If Email2SMS Config appears ’locked’, it is available to request by clicking the ‘Request This Product’ button.
Settings Overview
To ensure Email2SMS is securely configured for your organisation, the following four settings control who can send and/or receive messages using this application.
These settings are:
- Allowed Domains (table at bottom of page): Add a domain to restrict sending Email2SMS by all email addresses belonging to listed domains. You must use all lowercase
- Mail Servers (table at bottom of page): Add up to 5 IP Addresses/Host Names/Mail Servers to restrict sending Email2SMS to only those listed. Other addresses in the domain will not be able to send.
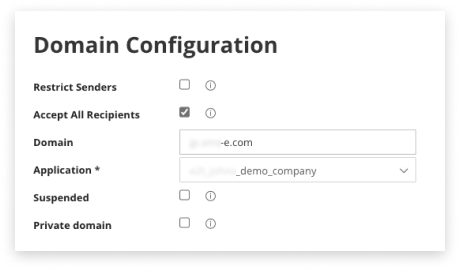
- Restrict Senders: If checked, email addresses must be registered as Senders to send Email2SMS.
- Accept All Recipients: If unchecked, phone numbers must be registered as Recipients to receive SMS. If checked, any phone number can receive an SMS via Email2SMS. An Allowed Domain OR Mail Server must be configured, to restrict unauthorised use.
Allowed Domains
Note: The Allowed Domains setting restricts users who are permitted to send Email2SMS messages by specifying the domain the sending email address must be sent from. This ensures that only users with the same email domain can send messages in Email2SMS.
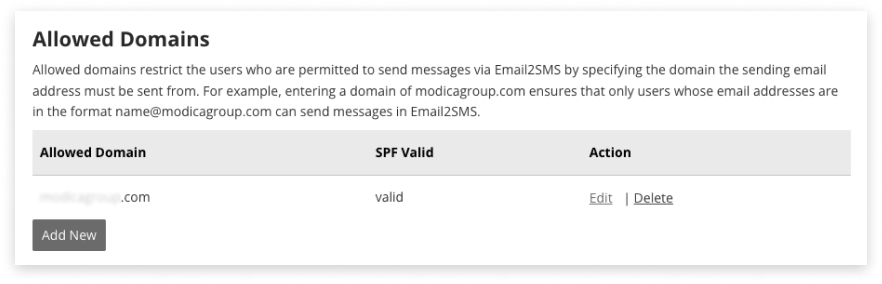
All email domains that are allowed to send messages should be added, including any system-generated/automated email applications. For example, listing mycompany.com as an allowed domain ensures only senders with an email address that ends with @mycompany.com can send Email2SMS messages.
Add a Domain
Click the Add New button under Allowed Domains.
- Domain name: Add your company domain in lowercase letters using the format mycompany.com (ignoring https:// or www)
- Private domain: Tick this if the domain is not publicly resolvable. DNS checks and MX Records will not be run
Edit a Domain
To edit an existing domain, click Edit next to the record in the Allowed Domain table.
Delete a Domain
To delete an allowed domain, click Delete next to the record in the Allowed Domain table. This will remove the ability for any email addresses with this domain to send SMS.
Mail Servers / IP Address
Note: This is an additional security setting to ensure that all messages are sent via one of these mail servers only. To maintain security, it’s best practice to use either Allowed Domains or Mail Server IP Addresses. The terms Mail Servers, Hostnames and IP Addresses are used interchanagbly here.
You may add up to five IP Addresses or Hostnames allowed to send SMS via your Email2SMS application.
Listing [0.0.0.0] would ensure only the Sender whose IP address address is [0.0.0.0] is able to trigger SMS to send.
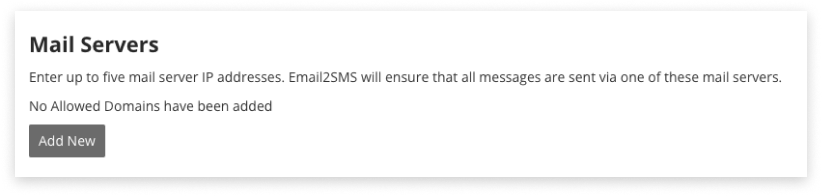
Add an IP Address
To add an IP Address, click Add New under Mail Servers.
- Domain: This is the Email2SMS domain used to trigger SMS.
- IP Address: Enter the IP Address of Senders allowed to use Email2SMS, e.g. 0.0.0.0 or 123.123.1.2.
Alternatively, use the hostname of the mail server used by your domain, e.g. mail.domain.com
Edit an IP Address
There is no ability to Edit IP Addresses. Instead, delete and add new.
Delete an IP Address
To delete, click Delete next to the relevant record on the Mail Server table. This will remove the ability for emails originating from this IP Address or Mail Server to send SMS.
Managing Message Length
Maximum Units and Email Truncation Sequence can both be configured as safeguards to prevent sending multi-unit messages longer than you expected.
Maximum Units
This setting exists to prevent accidental sending of long multi-unit SMS that include signatures, disclaimers, or email-threads. For even greater control, add an Email Truncation Sequence (below).
- The Email2SMS application is capable of sending up to 10 message parts (units)
- The default length of a message using standard characters is set to 1 message unit (160 characters). This can be increased based on your organisation’s requirements.
- The default length of a message using special characters is set to 1 message unit (70 characters) e.g. emojis, ™, ā, ‘
- SMS being sent will automatically truncate characters once this limit is reached. If Maximum Units = 2 and text contains special characters, the SMS will be cut off after 140 characters
- If you are unsure where an SMS will truncate, send a test message to yourself.
Email Truncation Sequence
This can be any code that signals a ‘cut-off point’ in your email body.
For example, set your Truncation Sequence to ***, then include *** at the beginning of default email signatures or disclaimers; the email signature will then be excluded from SMS.
Default Email
This email address is used for two purposes:
- SMS replies will be forwarded to this address, if an originating email address cannot be found
- Delivery receipts will be sent to this address (if the setting below dictates this)
Delivery Receipts via Email
Delivery receipts show the final status of an SMS sent via email; whether it has been received or if it failed. Select from one of the three options:
- Do not send delivery receipts
- Return delivery receipts to the original sender
- Return delivery receipts to nominated (default) email address
Please note: we may not receive a final delivery status back from the network carrier the message was passed to; in those instances, a delivery receipt will not be sent.
Sender IDs
Sender IDs (also known as source mask, alphanumeric masks, or just “masks”) replace the usual phone number the SMS appears to be from. They also prevent replies as there isn’t a phone number for the mobile device to reply to.
Each country has their own regulations and requirements for their use (e.g. not allowed in New Zealand or USA). Contact your Admin to apply for one.
Read about Sender ID here.Show Sender
This setting causes the Sender’s email address to be included at the end of the SMS. This counts towards the SMS character limit.
Include Subject
The email Subject line will be included at the start of the SMS. This counts towards the SMS character limit.
Email2SMS Domain
Domain set up is largely automatic. Settings include:
- Domain: Once the Email2SMS application is configured, this domain will be automatically generated.
- Application: The link between this Email2SMS domain and the networks carrying SMS. This will be set up to send with 1 source (e.g. +6421xxxx or 1234 or CompanyName). Your account may or may not have more than one Email2SMS application configured.
- Suspended: If ticked, this Email2SMS application will no longer be able to send or receive SMS.
- Private domain: If ticked (because a domain is privately owned/not publicly resolvable), DNS and MX Record validation checks will not be run. MX Records are drawn from the email server of a publicly owned domain.
Senders
The Senders list is only used when the “Restrict Senders” option has been ticked. When this option has been enabled, the application will check the sender’s email address against the ‘Senders’ list. If the email address is not on the list, the message won’t be sent.
The Senders tab has two distinct purposes:
- If the Restrict Senders setting is ticked in the Domain Configuration tab, then individual email addresses must be listed here in order for them to send SMS via Email
- If the Restrict Senders setting is not ticked, adding Senders will still allow for easier scanning of Volume Report data (who has sent what, when)
Add Individual Senders
Navigate to the Senders tab and click the Add Sender button (located under the search area).
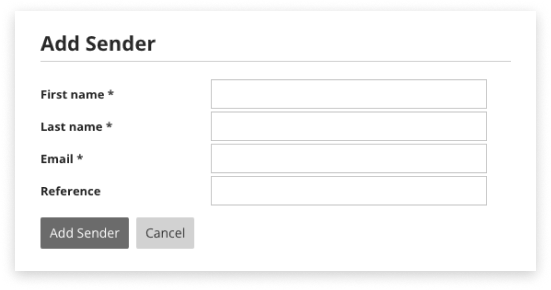
- First name, Last name: The Sender’s name. Special characters are supported.
- Email: The email address your Sender will be using to send SMS. Special characters are not supported.
- Reference: This is used for filtering SMS volume counts over in Email2SMS Volume Report, e.g. by department, office location, role.
Import Multiple Senders
Navigate to the Senders tab and click the Import Senders button (located under the search area).
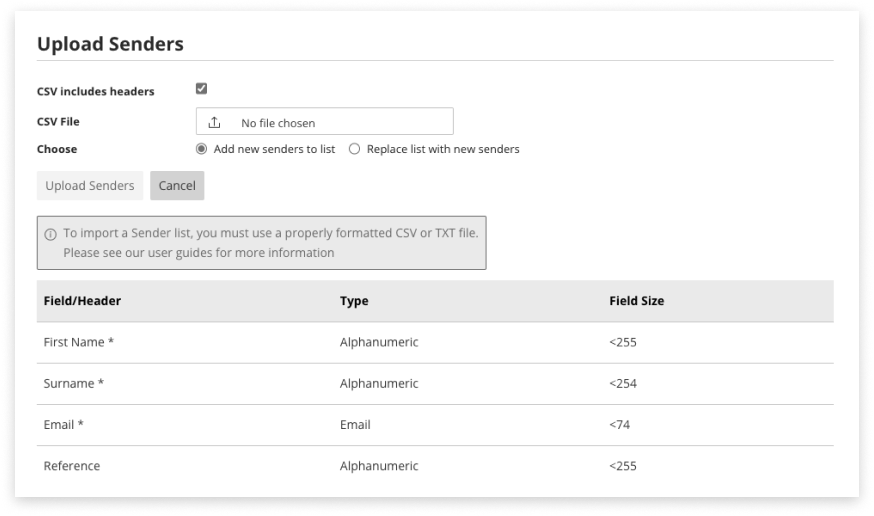
Format the File
Open a .txt template in a new window or download a .csv template here. Format a spreadsheet with the column-headers First Name, Last Name, Email and Reference (in that order, correct capitalization).
Save as .csv or .txt format.
- First name: required field. Supports up to 255 alphanumeric characters
- Last name:required field. Supports up to 255 alphanumeric characters
- Email: required field. Use email format. 74 character-limit
- Reference: optional field, alphanumeric, 255 characters
Both names and Email are required, Reference is optional.
The optional Reference field can be used to filter messages in the Email2SMS Volume Report e.g. by filter by department, office location, role etc.
Upload the File
The CSV includes headers option will be ticked by default. If your file includes the above headers, leave this option selected.
- CSV File: Select the file to upload. Must be .csv or .txt
- Choose<: Add new senders to the existing list of senders. Or, delete the current senders and replace them with those in the selected file.
Click Upload Senders to start the upload process, review the summary, and click Proceed.
Edit or Delete Senders
Search for, or locate the relevant sender in the table. Click Edit or Delete in the table.
To delete multiple senders, tick the checkbox to their left and click the red Delete Selected button.
Recipients
The Recipients tab has two distinct purposes:
- Registering allowed Recipients, or
- Creating Recipients to then add to a Group mailing list
- If the Accept All Recipients setting is not ticked in the Domain Configuration tab, then contacts must be listed in the Recipients tab to receive SMS
- If the Accept All Recipients setting is ticked, then any phone number can receive SMS (without being registered)
- The Recipients tab is also designed to act as a contact list of people that can be added to a group (see section ‘Groups’ below)
Add a Recipient
Recipients can be added individually or imported in bulk.
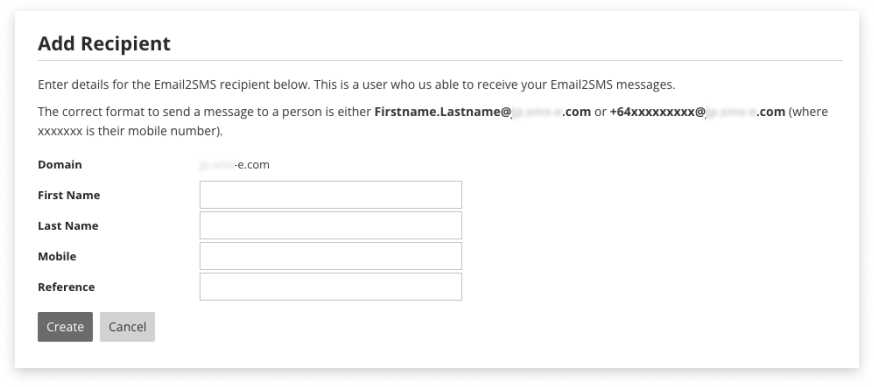
- Domain: This is the suffix that will be saved against the Recipient, e.g. +64xxxx@domain.com (this is the Email2SMS domain found in the Domain Configuration tab)
- First name, Last name: required. This is the Recipients name. Special characters are supported
- Mobile: required. This is the phone number of the recipient of the SMS. International format (+64…) is preferred
- Reference: The optional Reference field can be used to filter messages in the Email2SMS Volume Report e.g. filter by department, office location, role etc
Required information is First Name, Last Name, and Mobile.
Ideally mobile phone numbers would be saved in international format, e.g. +64xxx…
To send to alternative-format numbers, visit the Prefix Mapping tab to set rules.
Import Multiple Recipients
Navigate to the Recipients tab and click the Import Recipients button (located under the search area).
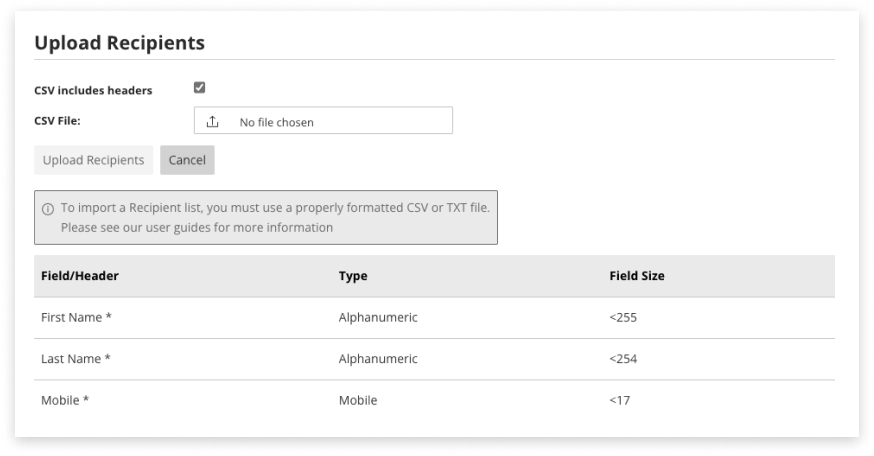
Formatting the file
Download a .csv template - or format a spreadsheet with the column-headers First Name, Last Name, and Mobile (in that order, correct capitalization).
Alternatively, you can open a .txt template in a new tab in a new browser tab and copy the contents across to a plain text editor like Notepad (Windows) or TextEdit (MacOS).
- First name: required. Supports 255 alphanumeric characters
- Last name: required. Supports 255 alphanumeric characters
- Mobile: required international mobile format e.g +64xxxxxxxxx. 17 character limit
Both names and Mobile are required.
If using Google Sheets, to keep displaying the + before an international phone number: set Mobile column Format to Automatic. Then type ‘+ (apostrophe plus) before the number, e.g. ‘+64xxxx
Recipients can be a member of multiple groups at the same time, but only exist in each group once.
Save as .csv or .txt format.
Uploading the file
- CSV Includes headers: If headers (e.g. First Name) are included in the file, then leave this selected
- CSV File: Select the file to upload. Must be .csv or .txt
Click Upload Recipients to start the upload process, review the summary, and click Proceed.
Edit or Delete Recipients
Search for, or locate the relevant recipient in the table. Click Edit or Delete in the table.
To delete multiple recipients, tick the checkbox to their left and click the red Delete Selected button.
Groups
Groups allow bulk SMS sending almost like creating a mail distribution list. Create a Group, then add recipients. Send SMS to a group by emailing the “Alias” displayed in the Groups table.
Creating a Group
This is a two-step process. First, add a Group. Second, add recipients/members to the group.
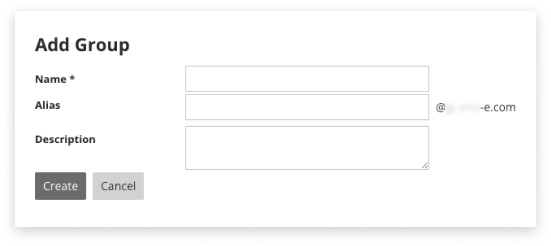
- Name: The name of the group
- Alias: This will become the prefix of the email sent to trigger an SMS to this group, e.g [group@email. com]
- Description: Optional
Once a Group has been created there are two ways to add recipients to it. The fastest way is from the Recipients tab.
1. Add via Recipients Tab
This is the recommended way to add multiple recipients.
- A group must already be created
- Recipients must already be created
- Navigate to the Recipients tab
- In the table, select checkboxes to the left of recipients to add to the group
- Click the Add To Group button
- Select the group
- Click Add
2. Add via Groups Tab
This is the alternate way to add multiple recipients.
- Recipients must already be created
- Navigate to the Groups tab
- Locate the group to update, in the table
- Click Edit next to that group
- Click Add Member
- Select a Recipient one at a time from the dropdown
- Click Add
Edit or Delete Groups
- Locate the relevant Group in the table
- Click Edit or Delete in the table
Prefix Mapping
SMS are able to be sent when they have an international format, e.g +64…
To save Sender’s time and prevent errors, load common prefixes to map to the international format.
Below are some suggested combinations to load, based on the country SMS will be delivered to:
| Country | Original Prefix | Cleaned Prefix |
|---|---|---|
| Australia | 04 | +614 |
| Australia | 614 | +614 |
| Australia | 6104 | +614 |
| New Zealand | 02 | +642 |
| New Zealand | 642 | +642 |
| New Zealand | 6402 | +642 |
| Indonesia | 02 | +628 |
| Indonesia | 028 | +628 |
| Indonesia | 0208 | +628 |
| Singapore | 05 | +65 |
| UK | 447 | +447 |
| UK | 0447 | +447 |
| UK | 07 | +447 |
Send SMS and Receive Replies
Once the application has been configured, you will be able to send and receive messages:
Send From Email
- Open your email client, such as Gmail or Microsoft Outlook
- Open a new email
- The subject line may or may not be included at the start of the SMS, depending on your settings
- Compose the SMS in plain text in the body of the email
- If pasting content in, right click and select ‘Paste Without Formatting’
- Check there is no unintended use of special characters
- Remove unwanted email signatures, disclaimers, etc
- Settings are available to do this automatically (Truncation Sequence)
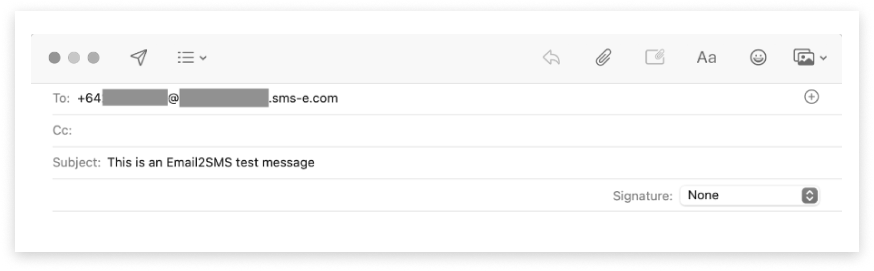
- Enter a recipient in the address bar, in one of the formats below. The email is the Email2SMS Domain registered to your Email2SMS:
- Unsaved mobile number example:
+64210000000@domain.sms.com - Saved recipient example: as above, or
firstname.lastname@domain.sms.com - Saved group example:
alias@domain.sms.com
- Unsaved mobile number example:
- It is advised to send a test message to yourself before sending a large campaign
- Send
Receive Replies to SMS
When a person receives your SMS on their phone, they may reply -
Replies will be sent as an email to the sender’s email address.
If an SMS is sent back and the sender’s email address could not be identified, the reply will be forwarded to a default email address (if one has been added in Domain Configuration).
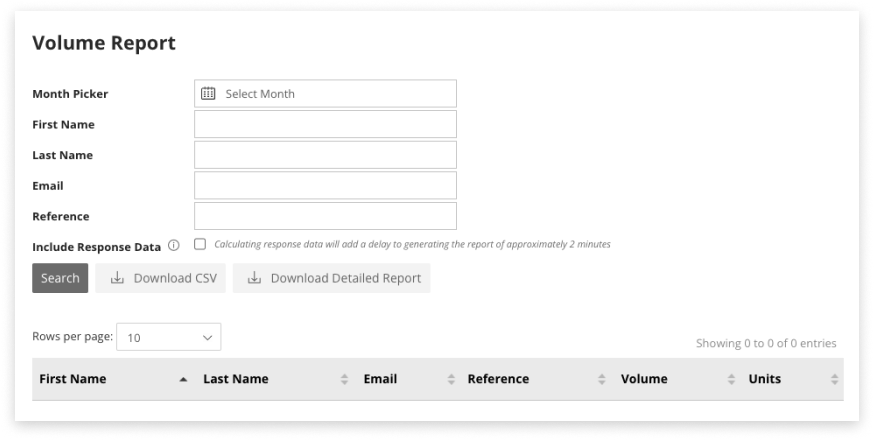
Volume Report
The Volume Report allows insight into the volume of sent SMS messages, broken down by Sender.
Generating a Report
- Navigate to the Volume Report tab
- Select the month you wish to view data for
- To narrow the report to a specific Sender, enter their Name or Email
- Or, filter the report to a Reference (this could be shared by more than one Sender)
- Include Response Data (if desired)
- This will display the number of SMS replies / responses received by each Sender
- Note that this will add a delay to the display of on-screen responses
- Click Search
You can download what is displayed on-screen as a CSV by clicking the Download CSV button.
The report is based on volume by Sender.
The Volume and Units columns may be different:
- Volume: The number of whole messages sent
- Units: The total of how many SMS Units comprised those messages
For example, appointment reminders may have been sent out to 100 people. These reminders were 189 standard characters long, which equates to 2 messaging Units each. The volume of messages = 100, the total message units = 200.
Detailed Report
This is generated in the same way as the Volume Report, simply click Download Detailed Report.
Extra information available in the Detailed Report includes:
- Sender’s Reference
- Recipient’s Reference (if they are a saved recipient)
- Message ID
- This can be used to deep-dive into the message’s delivery path in Mobile Report
- If you have permission to view it, then you will also be able to see message Content
- If you do not have permission then you will see a column full of “Permission required to access message content”
- Email ID
- Email address to which the recipient’s replies will be sent
- Destination mobile phone number
- Date and time a message was sent
Troubleshooting & FAQ
Below are some FAQ and their common fixes.
1. SMS Not Sending
If an SMS hasn’t been received, check Mobile Report, if the message doesn’t appear in Mobile Report, then it could be solved in the Domain Configuration tab*, in the Mobile Prefix Mappings tab, or in the email being used to trigger SMS.
*If you are unable to view these areas, then please contact your Administrator.
From the Domain Configuration tab, review these common fixes:
-
Does your company want to limit who can trigger SMS?
- Ensure at least one Allowed Domain or Mail Server (IP Address) is listed correctly
- Is “Restrict Senders” ticked?
- Check the person attempting to send SMS is listed correctly in the Senders tab.
-
Does your company want to restrict who can receive SMS, instead?
- Is “Accept All Recipients” not ticked? (aka Email2SMS has restricted recipients)
- Check the intended recipient of the SMS is listed correctly in the Recipients tab
- Is “Accept All Recipients” not ticked? (aka Email2SMS has restricted recipients)
-
Is your company set up to use a Source Mask, but trying to send it to a country that does not allow Source Masks (such as New Zealand and USA)?
- Check your Email2SMS Domain hasn’t been suspended by an Administrator
-
Are you attempting to send using the local number format instead of International number format?
- If so, please ensure you have added the prefix mapping for the country you wish to send to, i.e for Australia ‘04’ would be mapped to ‘+614’. Visit the Mobile Prefix tab and ensure mappings are loaded correctly for the country that the SMS is being delivered to.
-
Check what format the sender is attempting to use for the destination / address:
- If using a raw phone number at the start of the SMS email, ensure it’s written in international format, e.g. +6200000000@….
- Solve this problem long-term by setting up Prefix Mapping
- Ensure they’re using the Email2SMS domain in the email address
- Find this under Domain Configuration in the Domain field, e.g. companyname.sms.com
- If using a raw phone number at the start of the SMS email, ensure it’s written in international format, e.g. +6200000000@….
-
Check what format the sender is attempting to use for the body of the SMS
- Ensure the message is in plain-text, not HTML
2. Unsure if SMS Was Sent
If a message was successfully transferred from your email client to your Email2SMS Domain, then the message will appear in Mobile Report. (If you don’t have access to this, ask your Admin User).
Additionally, you can also check your domain settings to see if Delivery Receipts setting has been turned on, this will notify you of whether your message has failed or been received.
If the message does not appear in Mobile Report, please refer to the SMS Not Sending section.
3. Unsure if SMS Was Received
If you have enabled Delivery Receipts to be returned back to Senders or to a default email address (in Domain Configuration) then an email will be sent showing the final delivery status of your message.
Alternatively, look up the status of the individual message using Mobile Report.
4. SMS Are Cut Off Part Way
Truncating the email being sent as an SMS is controlled in the Domain Configuration tab.
Common fixes include:
- Increasing the Maximum Units
- The default is 1 unit
- 1 unit is 160 characters or 70 special-characters
- Checking for unintended special characters
- If a special character is used, each Unit becomes 70 characters long. If Maximum Units = 1 and a special unicode character is used, the SMS will truncate after 70 characters instead of 160
- Sometimes - or ‘ or “ become a special character in email
- Letters with macrons ā are special characters
- Some letters with umlauts ä are not special characters and won’t cause a reduction in the character count per Unit
- If a special character is used, each Unit becomes 70 characters long. If Maximum Units = 1 and a special unicode character is used, the SMS will truncate after 70 characters instead of 160
- Two settings (Show Sender and Include Subject) contribute to the character-count when they are enabled
- Check the Email Truncation Sequence has not accidentally been written in the email, causing an early truncation
Visit the FAQ on character encoding and truncation for more information.
5. Problems Receiving Replies
Here are some common fixes to issues with replies:
- My contact said they replied, but I never received it:
- Set a Default Email under the Domain Configuration tab
- SMS replies are returned to the original sender’s email when possible, but configuring a default ensures there’s always somewhere for them to go
- Check Source mask is set to ‘none’ in the Domain Configuration tab
- Check Mobile Report, filter on ‘MO’ and search the mobile number, if it isn’t in Mobile Report, the incoming message did not reach the SMS platform
- Set a Default Email under the Domain Configuration tab
-
Replies are being sent to the wrong sender’s email address
- Each instance of Email2SMS delivers SMS via one number
- If there is more than one sender emailing out SMS, they will all be delivered into the same ‘thread’ on a recipients’ handset (‘from’ the same number)
- Replies to that SMS thread will be sent back to the most-recent sender’s email
- You may require a second instance of Email2SMS to be set up; contact optussd@modicagroup.com for more information.
-
*We want SMS from different senders in our company to arrive separately to the recipient’s handset
- If there are multiple departments using Email2SMS, or you would like to have 2-way and 1-way options, we suggest using a second instance of Email2SMS. contact optussd@modicagroup.com for more information
6. Want to Prevent Replies
Use of a Sender ID (Source Mask) ensures that SMS communication is 1-way.
The Sender ID replaces the mobile number which means that the handset is unable to respond.
This functionality is only available for countries that allow the use of Sender ID (otherwise known as source masks, alphanumerical masks, or masks).
Sender ID information is documented elsewhere.
To request a Sender ID, contact your Admin or salesperson. Once a Sender ID has been approved for use, it will become available to select as a Source mask in Domain Configuration.
Additional Information
1. Character Sets
Email2SMS supports all character sets under the IANA Best Practices Document: rfc2978.
- There is a high chance character sets outside of this group will work but handset delivery of the message is not guaranteed
- Odd character conversions or replacements could occur
Read the full list of supported character sets
2. Content Transfer
Email2SMS officially supports the follow content-transfer-encoding types:
content-transfer-encoding
| `Content-Transfer-Encoding: 7bit(ascii, no content transformation)` `Content-Transfer-Encoding: 8BIT(no content transformation)` `Content-Transfer-Encoding: base64` `Content-Transfer-Encoding: quoted-printable` |3. Sample Email Message Header
| `Accept-Language: en-NZ, en-US` `Content-Language: en-US` `X-MS-Has-Attach:` `X-MS-TNEF-Correlator:` `checkininfoid: 6xxxxxxxxxxxxxxxx2` `x-originating-ip: [192.168.1.1]` `Content-Type: text/plain; charset=\"windows-1257\"` `Content-Transfer-Encoding: quoted-printable` `MIME-Version: 1.0` `X-SEG-SpamProfiler-Analysis: v=2.3 cv=ZoWT1OzG c=1 sm=1 tr=0 a=Ukw1KGl9ipg==:117 a=KAcaXhktmrlDw==:17 a=xqWC_4A:10 a=iHztI4A:10 a=PIiAA:10 a=dESJ3IA:10 a=9P7hX2pGXIMA:9 a=45L-IA:10` `X-SEG-SpamProfiler-Score: 0` |